Anna the Edge Peer
In the previous section, we already developed a fully functional Rendezvous Peer, merely by setting up the correct configuration. The peer is based on Jérôme's Verstrynge's book Practical JXTA II, which includes many other examples, such as "Anna the Edge Peer". Anna is supposed to connect to the Rendezvous Peer, so let's add this peer to our workspace! Add a new JP2P bundle project, like we did previously, but now select a JXSE Bunde Edge Project, call it org.mydomain.anna, and press "Finish".
When you open the jp2p-1.0.0.xml configuration file, then you will see the following:
<?xml version='1.0' encoding='UTF-8'?>
<jp2p-container name="Anna the Edge Peer" auto-start="true">
  <properties>
    <bundle-id>org.mydomain.anna</bundle-id>
    <home-folder>${user.home}/.jxta/${bundle-id}</home-folder>
  </properties>
  <persistence-service context="Chaupal"/>
  <sequencer-service name="rdv">
    <properties>
      <watch-id>org.mydomain.rdv.netpeergroupservice</watch-id>
        <status>active</status>
        <time-out>9000</time-out>
    </properties>
  </sequencer-service>
  <network-manager id="org.condast.p2p.manager" wait-for="rdv">
    <properties>
      <config-mode>EDGE</config-mode>
      <peer-id create="true" persist="true"/>
    </properties>
    <network-configurator id="org.condast.p2p.network" clear-config="true">
       <properties>
         <security>
           <password>admin</password>
         </security>
         <tcp>
           <properties>
             <port>9716</port>
             <incoming-status>true</incoming-status>
             <outgoing-status>true</outgoing-status>
           </properties>
         </tcp>
         <http>
           <properties>
             <port>8082</port>
             <incoming-status>true</incoming-status>
             <outgoing-status>true</outgoing-status>
            </properties>
          </http>
          <multicast enabled="false"/>
          <seed-list type="rdv" use-only="false" max-clients="5">
            <properties>
              <condast1 net="tcp">localhost:9715</condast1>
            </properties>
          </seed-list>
          <seed-list type="relay" use-only="false" max-clients="5">
            <properties>
              <condast2 net="http">localhost:9715</condast2>
            </properties>
          </seed-list>
        </properties>
    </network-configurator>
  </network-manager>
</jp2p-container>
Code Walkthrough
Many of the settings are fairly comparable to the previous P2P node we made, and the many of the other settings are explained in the book, especially the settings of the NetworkConfigurator. The connection with Rendezvous Node is determined by the seed list, where the seeds have to point to the correct ports that are provided by the Rendezvous peer:
<?xml version='1.0' encoding='UTF-8'?>
<jp2p-container name="Anna the Edge Peer" auto-start="true">
  ...
  <network-manager id="org.condast.p2p.manager" wait-for="rdv">
    <network-configurator clear-config="true">
       <properties>
          ...
          <seed-list type="rdv" use-only="false" max-clients="5">
            <properties>
              <condast1 net="http">localhost:8081</condast1>
            </properties>
          </seed-list>
          <seed-list type="relay" use-only="false" max-clients="5">
            <properties>
              <condast2 net="tcp">localhost:9715</condast2>
            </properties>
          </seed-list>
        </properties>
    </network-configurator>
  </network-manager>
</jp2p-container>
However, we face a small problem. In order to run the example, we need to be sure that the rendezvous node is started prior to the rendezvous node. Therefore a new JP2P sequencer service is added to ensure the proper startup sequence. The important bits of code are depicted below:
<?xml version='1.0' encoding='UTF-8'?>
<jp2p-container name="Anna the Edge Peer" auto-start="true">
  ...
  <sequencer-service name="rdv">
    <properties>
      <watch-id>org.mydomain.rdv.netpeergroupservice</watch-id>
        <status>active</status>
        <time-out>9000</time-out>
    </properties>
  </sequencer-service>
  ...
 <network-manager wait-for="rdv">
    ...
  </network-manager>
</jp2p-container>
First the sequencer service is defined and given a name. In this case we call it 'rdv', but it could be anything. Then we tell the service to keep an eye out for the activation of
org.mydomain.rdv.netpeergroupservice
Note that this is the netpeergroup service from the other jp2p bundle! When the service is activated, it will wait for another nine seconds before starting.
But exactly what will start? Well, the directive 'wait-for', which is included in the networkmanager service, is taking care of that. This service is told to wait for 'rdv' (or whatever name you provided for the sequencer service), and start when the sequencer fires. This allows for a fine-grained control between the two projects.
When using the sequencer service, one has to keep in mind that it only works in DeveloperModes.DEBUG, because only then build process of the container is shared with other bundles. In a normal situation, your Rendezvous node will be located on a server, and the edges will present on different computers. The option of running multiple nodes in one workspace, is therefore only useful when developing and debugging a P2P network.
If all went well, you will see the two JP2P projects run in the IDE.
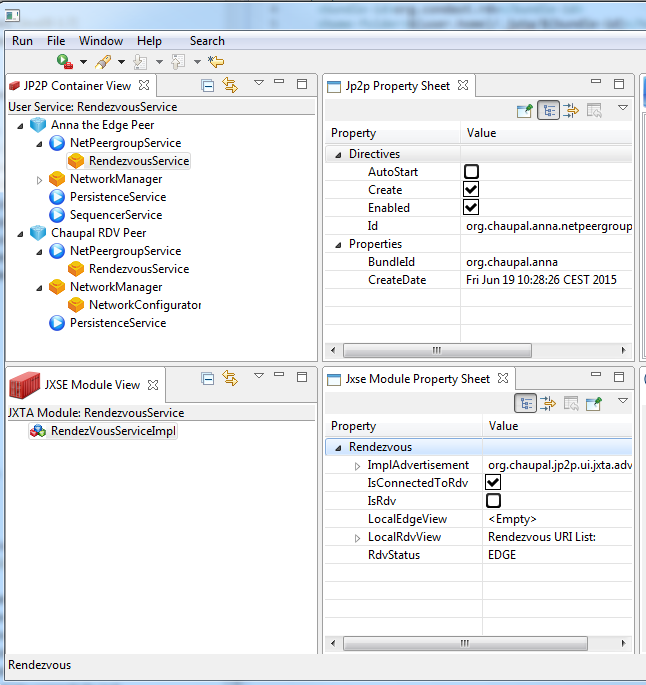
The JP2P container viewer shows the properties and directives which are entered in the jp2p-1.0.0.xml file. Below that, the JXSE Module viewer shows how these proeprties and directives translate to the the settings in JXTATM modules. If you select The Rendezvous service of the Chaupal RDV Peer, you will see that the 'isRDV' property is set. Do the same for Anna the Edge, and you should see that this not 'isConnectedToRDV', as depicted above. If this is the case, then you have just made your first P2P network!