| 1. Introduction | ||
|---|---|---|
| Prev | Next | |
The Chaupal Container for JAVA P2P applications
So far we have created an RCP project with the Chaupal JP2P project.
Now we add a new plugin project in the same fashion as we did earlier:
File -> New -> Plugin Project
When the wizard opens, we select an 'OSGI Framework' project and follow the guidelines of the wizard until certain templates can be selected. Give the bundle a name, such as:
org.<your organisation>.rdv
where you fill in the organisation of your choosing.
In the list you can see two JXSE bundle options. Select the RDV option and press 'finish'.
We now have two bundles in our workspace. Time to see what this may achieve!
In order to see the differences, we first need to make a few changes to the standard launch configuration. Open the launcher:
Run -> Debug Configurations
and select the 'Plugins' tab. Here you see a list of all the bundles that are activated when you run your application. By default, all the plugins and features are activated. For now, we respect this option, but we change the launch with option to run with the 'bundles selected below'. Then we set the 'auto-start' option of the new bundle to 'true'. Next we have to set the auto-start option to 'true'' for:
We need to make one modification in the Activator class that was generated when the new bundle was created. Change the constructor as follows:

Your first Chaupal JP2P project is up and running!
You may ask yourself why the Activator constructor has to specifically changed, instead that we implemented this immediately. The answer is that we want you to understand that your Chaupal JP2P application is running in it's own virtual machine, and that the only way you can share it with other bundles is when the DeveloperMode is set to debug. When you take your bundle into production, you will be certain that no other bundles can access the peer-to-peer node you made. Only when developing, a declarative service is available that allows other bundles to access the container, such as the Chaupal UI bundles. Otherwise it is closed and your JP2P container is secure.
File -> New -> Plugin Project
When the wizard opens, we select an 'OSGI Framework' project and follow the guidelines of the wizard until certain templates can be selected. Give the bundle a name, such as:
org.<your organisation>.rdv
where you fill in the organisation of your choosing.
In the list you can see two JXSE bundle options. Select the RDV option and press 'finish'.
We now have two bundles in our workspace. Time to see what this may achieve!
In order to see the differences, we first need to make a few changes to the standard launch configuration. Open the launcher:
Run -> Debug Configurations
and select the 'Plugins' tab. Here you see a list of all the bundles that are activated when you run your application. By default, all the plugins and features are activated. For now, we respect this option, but we change the launch with option to run with the 'bundles selected below'. Then we set the 'auto-start' option of the new bundle to 'true'. Next we have to set the auto-start option to 'true'' for:
- net.jxse.jetty
- net.jxse.netty
- net.jxse.osgi.platform
- org.eclipse.equinox.console
- org.apache.felix.gogo.command
- org.apache.felix.gogo.runtime
We need to make one modification in the Activator class that was generated when the new bundle was created. Change the constructor as follows:
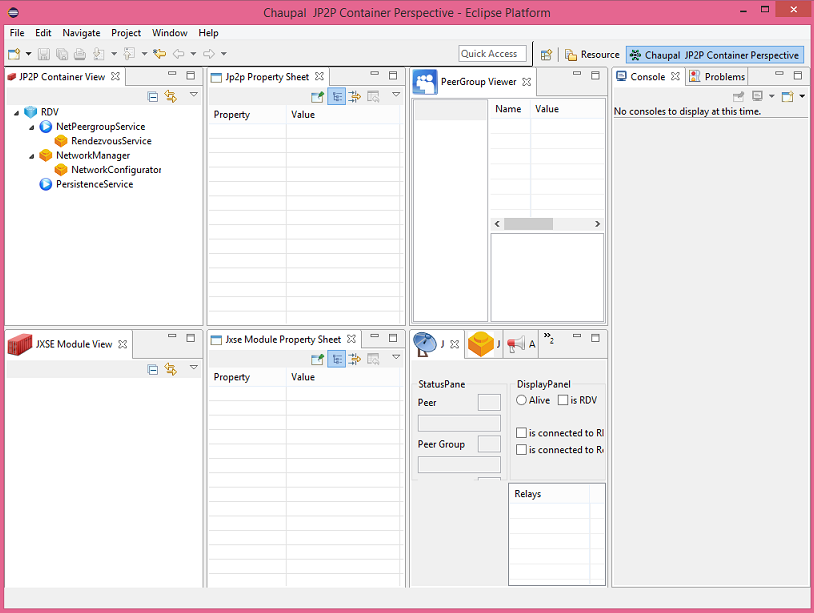
Relaunch the application. If all went well, you should be seeing something like this:public Activator(){super ( S_PLUGIN_ID, DeveloperModes.DEBUG ) { }

Your first Chaupal JP2P project is up and running!
You may ask yourself why the Activator constructor has to specifically changed, instead that we implemented this immediately. The answer is that we want you to understand that your Chaupal JP2P application is running in it's own virtual machine, and that the only way you can share it with other bundles is when the DeveloperMode is set to debug. When you take your bundle into production, you will be certain that no other bundles can access the peer-to-peer node you made. Only when developing, a declarative service is available that allows other bundles to access the container, such as the Chaupal UI bundles. Otherwise it is closed and your JP2P container is secure.
| Prev | Next | |
| Chaupal User Guide | Home | 1.3 Setting up the Eclipse IDE and Chaupal Tools |
Hosted on GitHub Pages � Theme by orderedlist